About Last wish raid

Last wish raid

The raid named Last Wish occurs in the Dreaming city which is a Destination in Forsaken. In the Reef born Awoken, which is the place of meditation and study, the Dreaming City is the most sacred place. The Last Wish is the termination of the storyline of expansion. It is also known as one of the most important raids of Destiny 2. King’s Fall, the previous record holder in the Destiny 2 series beating out by this raid. The reason for this raid is to stop the Taken who have been corrupted and twisted by the Darkness’s power. The Taken are the army of different races who try to corrupt the motherland of the Awoken. On 14th September 2018 this raid was included in the game. A minimum power of 520 is required to attempt the Raid, however throughout the event the power of the enemies as much as 580.

Forsaken is here and with it brings a whole brand new raid on the dreaming city. The first encounter within the last wish starts immediately with a boss fight, unlike other raids which have raid opening encounters. Kali, the first boss you encounter is in the centre of a vast open area. To start the encounter you just need to step on one of the many plates found around the area or shoot at her. Around Kali, you will see 6 symbols which match the symbols of the plates around the arena. To complete this encounter all you need to do is split into 2 teams of 2 and take on a set of symbols each. Completing the plate and killing the knight will start the damage phase on Kali. Kali will shortly after begin her wipe mechanic, to avoid her wipe mechanic entering one of the 6 doors that open just prior, this will happen 3 times and if she hasn’t died by the end of the 3 phases, repeat again until completion. The next encounter is also another boss fight, this time with Shuro Chi. Within this encounter, you will be continuously clear adds and moving forward. Start by gathering at the door then soon as it opens clear all the adds as fast as possible then you should see 3 weapons spawn on a plate, 3 players should pick those up jump on the plates and then fire at one another creating a triangle around Shuro Chi. This will then remove her shield and allow you to do a small amount of damage to her stunning her. More adds will spawn clear through them and then stun Shuro Chi again. You will then enter a puzzle room. On the wall you will see the puzzle, to solve it all you need to do is stand on the corresponding plates to fill in the gaps on the wall. This will take 4 players to do so, repeat this 2 more times to complete the whole puzzle and have the path forward reveal itself. Repeat this for 2 more floors and you have completed the Shuro Chi encounter. Moving on to the 3rd encounter and 3rd boss fight this time against Morgeth. There are many different methods on how to complete this encounter but it’s quite simple. All you need to do is have each player grab 2 of Morgeths strengths and unstuck any player Morgeth decides to freeze in place. Once you have done this you are able to DPS Morgeth. Moving on after the 3rd encounter you will arrive at the 4th encounter which is called the Vault encounter. This is your first puzzle encounter. To complete this encounter you need to unlock the vault by dropping the correct buffs on the correct plates. The objective here is to have 3 callout and buff players and then 3 add clear players whose job it will be to stop the taken knights from getting to the callouts players’ plate. The callout players will have to match their middle symbol to their teammate’s left or right symbol. Your left and right symbols will be known as Penumbra or Antumbra. The position of the duplicate icon – left or right – will dictate which buff you need to cleanse it. If the duplicate icon is on the left, you need Penumbra; if it’s on the right, you need Antumbra. Repeat this 3 times until you complete the Vault encounter. Finally, you will be at the final encounter, the 5th encounter. Riven of 1000 voices boss fight. We recommend you use the riven cheese to complete this encounter. To do the Riven cheese you will all go into 1 side of the boss encounter and either stay and clear all ads or join allies and move quickly over to the other side and DPS Riven in the side of her leg using weapons such as swords within a well or bubble. If your best DPS is more ranged you will shoot her within the mouth. After this boss fight, you will have to essentially play pass the parcel and escort the player with Rivens heart until you take it back through the vault encounter and fall back down, after dunking the heart you will spawn all the chests and have completed the Last Wish raid!

1st Step Kalli

Kalli is taken by the king Auryx, who also known as Oryx. Then kalli became the Taken monstrosity. Before that, the Queen was served by this Awoken TecheunKalli. When the Guardian fire team arrives in the massive chamber, the raid starts. There are 9 plates in that place along with different platforms. A cluster of 3 pairs of six icons will emerge near to the central pit. For every icon type there is a matching plate throughout the area. There are three portions in each plate with an embedded symbol. To defend the Taken the Guardians have to be on the clear part of the plate. A Taken knight will originate after holding the three rounds of explosions by a plate, caused by the Taken Blight bomb. That plate will be completed after killing the knight. In the room’s central area, they need to gather with all players after completed all the plates to diminish Kalli. In 15-second after she enters the room the guardians have to focus on the fire to destroy her otherwise she will use an ontological weapon to damage the team. To unlock the last available subclass tree, the players can achieve the ultimate Seed of Light by destroying Kalli.

2nd Step SHURO CHI

The following area takes to the Initial Spire, which is shelter to Shuro Chi. Shuro Chi starts her song after entering the area which starts a timer with count down of 4:00.To protect themselves, the fireteam has to resist Shuro Chi to finish her song. After all opponents have been destroyed, Shuro Chi starts to raise the voice of the song to begin the timer as quickly as before. There are 3 plates equipped with crystals around Shuro Chi. Three players need to be on the top of the plates to form a triangle shape of beams and shoot at the crystal to interrupt her concentration. Shuro Chi starts to sing the different song while the Guardians are destroying Shuro Chi. Also to break the Taken formation the fireteam can act super move of bomb attack. Moreover they can destroy the formation by the Grenade attack. To interrupt Shuro Chi a Guardian needs to attack by bomb to damage the Taken form before the end of her song. In the final part of her health, opponents will appear while fireteam is trying to destroy Shuro Chi. Again for interrupting Shuro Chi’s concentration, three players must be the devoted “Laser team”, as well as 2 units of assigned users of Taken Form.

3rd Step MORGETH

In next encounter the fireteam has to face the Spirekeeper named Morgeth, a huge Orge of Taken. Morgeth will appear and call a huge amount of Taken opponents after the Guardians reach the area. Many energy columns will generate, after beating Taken enemies. From these energy columns Morgeth seeks the Taken Strength. The Guardian will die of corruption if at the same time one Guardian tries to hold more than 2 Taken Power. Granting the debuffUmbrel Enervation Morgeth tries to confine Taken Powered players in the siphon. By collecting the Taken Essence Orbs and destroying the Eye of Riven enemies, a player of the fireteam able to free the trapped players from the siphon which means players able to free other players confined by Morgeth if they are equipped with the Taken Essence. However it is necessary to understand who can absorb the power to prevent death as the team member who already saves a trapped member inherits the Taken Strength. At the last stage of the battle, in front of Morgeth a Taken Strength appears when enough players have assembled. Then, the Taken Essence equipped player must use their power to stagger Morgeth when he is at 80-90 percent.

4th step Vault

The vault is the next stage of the raid. To arrive this phase need to climb the observatory top. There is a mechanism surrounding by three blue pressure plates at the centre of the chamber’s room. With a timer, players will get the Vault Safety System debuff. The player will die with the expiration of the timer. After a small period, the eyes of Riven will appear and the players should get the essence of Taken. The embedded marks of mechanism depict the order of the plates which should be cleaned will be seen by the players while standing on the plates. To carry the info to the other players as soon as possible, good communication plays a vital role. The plate should be cleaned by the Penumbra buff if plate including the matching icon located at the left whereas, the plate should be cleaned by the Antumbra buff, if the matching icon is at the right side. While the other players guide the team members to the matching plate only a team member will be assigned for gripping the Taken Essence orb. The Security Mechanism timer of the vault will reset after cleared all 3 plates. To fully clear it, the fireteam has to repeat the riddle 2 further times.

5th step Riven

Last wish raid

Riven of a Thousand Voices, the final boss of the Last Wish raid will appear after defeating Kalli, Shuro Chi, Morgeth, and also after the solving the Vault security challenge. This dominant Taken Ahamkara Riven influenced UldrenSov. Riven appeared to UldrenSov to corrupt him as Mara sov, who is the sister of UldrenSov to reveal the Dreaming City. Beforehand the battle starts, one for the two rooms, divide the fireteam between 2 basic teams. To start the encounter need to step on the plates. There can be different phases whether this final boss is in the subteam’s room or your room. Between these two rooms of the chamber Riven can jump. A player needs to bait Riven’s charge at the ground while she attacks with tentacles. Look to cleanse the room if the final boss does not seem in the subteam’s room. Defeating a Knight of Riven will leave a relic. Then in your subteam’s area Riven will spawn. The team will able to reach into an elevator which will bring the team to a new chamber, when the exact Riven’s eyes are attacked by the complementary subteam. Then the team can be back into the previous room, subsequently after an effective stun of eyes of Riven for a second time. Riven uses her tentacle and fire attacks as well as appears inside the room in different locations. To start the encounter players need to go to the plate used to cleanse. On Riven’s body blisters can seem. For extreme damage those weak points should be attacked. Until Riven is nearly destroyed, we need to back to the antechamber as well as recurrence the stage after the landing of the fire team. Then to the Realm of Ascendant, players will get teleported at the end of Riven’s health. Finally Riven attempts her ultimate attack after you will get back to the proper realm.

Last Step Queens Walk

This is the Riven attack’s final step. In this stage fireteam needs to attack Riven’s heart. The players will be moved to the Queens walk after they are allowed to get the Ethereal Key. Then to transport an orb that offers a protective bubble, Riven will choose one player from the fireteam. To make the way for the orb carrier it is necessary to dip out and in of the bubble. The player will die if he stepped outside of the bubble. Again the heart of Riven will choose another player when the orb timer expires and then the player needs to continue the journey. In the Ascendant Realm the former carrier will appear. To enhance the timer of the orb carrier players have to clear opponents and collect more Taken Strength. The rest of the players have to continue the journey onward as well as in the Ascendant Realm more team players will add the former orb carriers. While in the realm, players should collect the Taken Strength buffs and continue to destroy mobs. The fireteam will be at the end of the chamber as well as the completion of the raid of Last Wish while the last player able to finish their way to the very end with the orb. To unlock rewards you need to use the Ethereal Key and also have to find out the rooms with many chests.

Prerequisites

Though, the power 520 is necessary for The Last Wish, yet power 550 is suggested for this raid. As while players get the option to enter the raid at the 520, it’ll be outlandish, and still ridiculous intense at 530. The recommendation is to have minimum power 540 as a down to earth least necessity for The Last Wish. Furthermore there would be a minimum of four players needed to finish the Riven boss fight in the Last Wish raid. Previously four-player groups managed to beat the encounter. However, now a 2-man group has done it after discovering a few exploits.

Time duration

This last wish raid is exceptionally hard, involving five diverse encounters and players are suggested to have a much greater power level. This raid took exactly eighteen hours and forty eight minutes to finish which breaks the lengthiest undefeated Destiny raid’s record by 4 hours. So it can be said that it takes around 19 hours to finish thus the players must have the patience to play a long time to complete the last wish raid.

Requirements

-Must have completed Forsaken campaign
-540 Power Level required, 560 Power Level recommended

Recommended Weapons
-Handcannon (Better Devils, etc) 
-Full Auto Shotgun (Ikelos Shotgun, Perfect Paradox)
-Sleeper Stimulant
-Whisper of the Worm

Potential Rewards
-One Thousand Voices Exotic Fusion Rifle (highly requested and good for pvp)
-‘Wish No More’ Legendary Emblem
-‘Dreaming Spectrum’ Legendary Shader
-Ermine TAC-717 Legendary Ship
-Cleansing Knife Legendary Sparrow/Vehicle
-Wish Maker Shell Legendary Ghost Shell
-Chattering Bone Pulse Rifle
-Transfiguration Scout Rifle
-The Supremacy Sniper Rifle
-Age Old Bond Auto Rifle
-Tyranny of Heaven Combat Bow
-Techeun Force Fusion Rifle
-Nation of Beasts Hand Cannon
-Apex Predator Rocket Launcher

Please leave log in details at checkout!

FAQs

Once you place an order, it is automatically logged in our system.  We will use the contact info you provided on checkout to contact you before we sign onto your account.  The best method to contact you is via email!  We use an automated email system to send you alerts on your order status.

Contact by Text > Contact by Email > Contact directly to your Gamertag/PSN.

The point here is that we don’t want to sign you out of your account while you are enjoying a game.

Once we are on your account we go straight to business and complete whichever service you purchased. When we are done, we notify you by the same contact methods and have a completion email sent.

We get this question all of the time. We are a completely legitimate website and have accumulated plenty of feedback from satisfied customers.   Check out our feedback section.   The bottom line is we will need your trust to do an account recovery, and all we can do is prove our history with reviews.  You are more than welcome to change your password the moment we tell you that your order is completed.

Once you purchase, the order will take up to 24 hours to complete. Usually orders are started immediately and completed within 6 hours of purchase. If needed, we can also schedule your order for a specific time. 

No.  Only one person can be signed onto an account at one time.  If you sign on, we will get signed out. That may result in a penalty due to lost progress in an activity.

We take your account’s security very seriously.  Our partners consist of trusted players that work exclusively for GuardianBoost.  Our reputation means everything to us and we have safely conducted thousands of account recoveries for our customers.

We completely understand that there is an amount of trust that needs to be given to let a stranger on your account.  If you are concerned, we highly suggest taking a look at our feedback!  We would also recommend changing your password to something temporary, and then changing it again when we complete your service.

Our team has a strict policy to not tamper with any of your PSN/Gamertags general settings.  Your weapons and armor will not be infused into other gear.  We may use an Item Manager (such as DIM or Ishtar Commander) to move items around or put things in the vault to make space.  Also, we may change controller settings. But NEVER delete anything. 

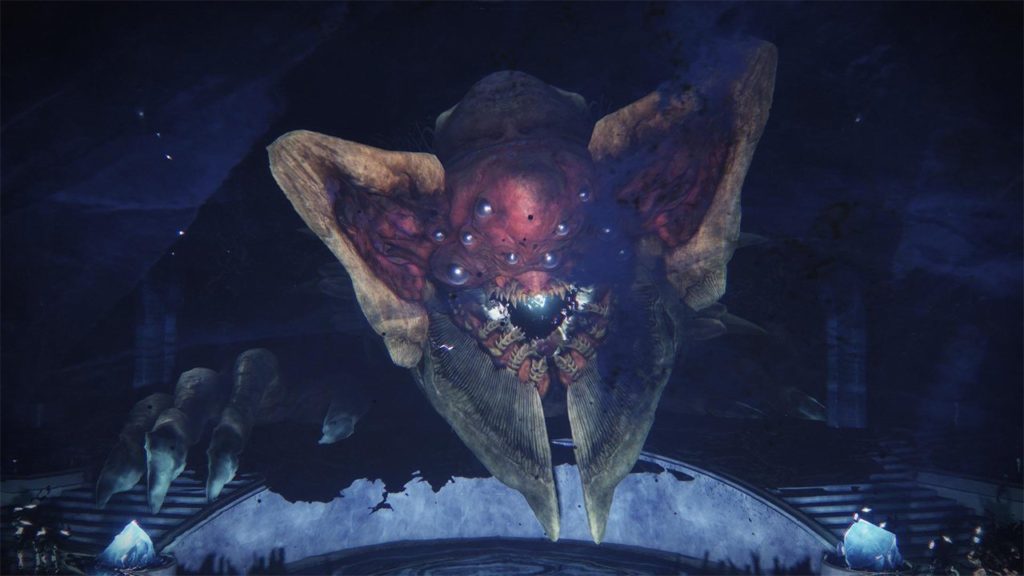
LAST WISH RAID REWARDS All rewards are completely random (RNG) and not guaranteed. 1k voices One Thousand Voices Exotic handcannon The Supremacy Sniper Rifle Tempered Dynamo Apex Predator Rocket Launcher Reckless Oracle Transfiguration Scout Rifle Combat Bow Techeun Force Fusion Rifle sparrow Chattering Bone Pulse Rifle Tyranny Tyranny of Heaven Combat Bow Nation of beasts Nation of Beasts Hand Cannon Age old Age-Old Bond Auto Rifle hunter helmet arms chest legs cloak titan helmet arms chest legs class item  helmet arms chest legs warlock class item On top of this, you will unlock the raid emblem "Recovered Memories Emblem". Wish no more

Customer reviews

Rated 5 out of 5 stars
7 reviews
4 stars 0 0 %
3 stars 0 0 %
2 stars 0 0 %
1 star 0 0 %

7 reviews for Last Wish Raid

Add a review